Custom Widgets
So far, we have only used widgets that are part of Qt—radio buttons, check boxes, push buttons, etc. But in many projects, you will be using widgets that you have defined yourself; so-called custom widgets, which should not be a surprise, since Qt makes defining custom widgets very easy.
To make these custom widgets accessible for Qt Designer, you need to write descriptions for them. Writing these descriptions is rather easy, and Qt Designer facilitates it by providing a special dialog.
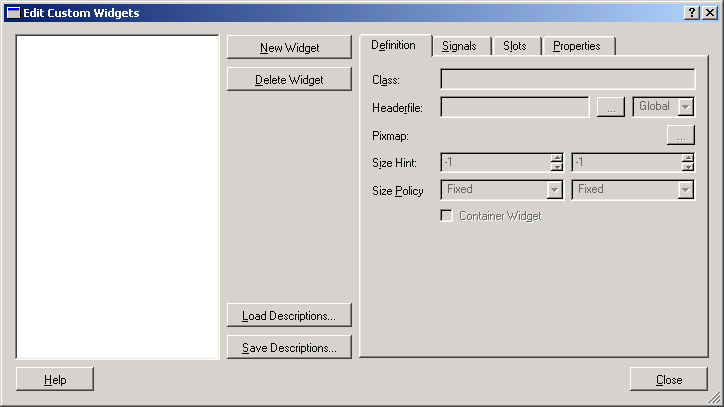
You reach this dialog by selecting Tools/Custom/Edit Custom Widgets from the menu bar. The dialog shown in Figure 5-4 opens. It consists of three parts. On the left is a list of all custom widgets that are currently known to Qt Designer. When you open this dialog for the first time, this list will of course be empty. To the right of this list are four action buttons for creating a new custom widget description, deleting an existing description, loading a description file, and saving the current descriptions to a file.
Probably the most interesting part is in the right half of this dialog, where all the properties of a custom widget can be defined on four tab pages: Definition, Signals, Slots, and Properties.
In most cases, your widget will already be finished when you write a Qt Designer description for it. Thus all you need to do is mechanically go through all the fields, look for the information in (mostly) the header file of the widget, and fill it in.
You start this process by clicking the New Widget button. Qt Designer will create an entry for a class called MyCustomWidget that has default values. Now go to the Definition tab page. The two pieces of data that you will want to change in every custom widget are of course the class name and the header file. You can assign a pixmap to this widget that will then be used in the menus and the toolbar, where you can select your new custom widget. If your widget has a size hint and/or a size policy, you can set these on this tab page as well. [1]
On the Signals tab page, you enter all the signals that your widget has. This will make it possible later to connect these signals to slots in other widgets by means of the ordinary Qt Designer technique. Just click on the New Signal button and change the default signal name clicked() to the name of your signal. Add the parameter types in the parentheses.
The Slots tab page works the same—you can define all the slots here that your custom widget defines. In addition to the slot name and parameters, you also need to specify the access. Remember that all this is already determined in your class definition; you just need to copy this information from the header file.
Finally, you can set the properties on the last tab page. Again, just copy the information from your class declaration.
Once you are done entering the data for all your custom widgets, you can save them to a file by clicking the Save Descriptions button. If you want to access these definitions later, you can load them again via the Load Descriptions button. This also makes it possible to load custom widget definitions that others have provided. It is even thinkable that any third-party Qt widgets shipped in the future will be shipped with Qt Designer description files. You can load as many description files as you like. But all description files that you have loaded once will be loaded again automatically next time. Also, when you open a form with custom widgets that are not yet loaded into Qt Designer, they are loaded automatically as well.
After you have defined your custom widgets or loaded a description file, you can access the custom widgets from the toolbar or via the Tools/Custom submenu.
Notes
| [1] | If you are unsure what size hints and size policies are, please see the Qt reference documentation. |


