
CHAPTER 2 - THE XDL_VIEW VIEW-OBJECTS
2.1 INTRODUCTION
The view-objects basically fall into two categories. These are the general purpose view-objects which are written without any particular application in mind (e.g the menu area view-object or the I/O window view-object) and those which are written with a particular application or group of applications in mind (e.g. the image view-object)A number of the view-objects contain an 'active strip' area (see below for details) which indicates whether or not the application program is currently ready to receive input from the view-object in question.
Some of these routines make use of some panel items whose function and operation are described below in Chapter 3 of this volume.
List of sections:
The 'Active Strip' Area
The Base Frame View-Object
The Menu Area View-Object
The Parameter Table View-Object
The I/O Window View-Object
The Graphics Window View-Object
The Pop-up Notice View-Object
The Pop-up Dialogue Box View-Object
The Pop-up Menu View-Object
The Pop-up Frame View-Object
The Progress Bar View-Object
The Blank Object View-Object
The Image View-Object
The Laue Simulation Display View-Object
The Rotation Simulation View-Object
The Show Unique Coverage View-Object
2.2 THE 'ACTIVE STRIP' AREA
View-objects, which can return data to the program, will normally contain an 'active strip' area. This indicates whether or not the program is waiting for the view-object to return data (e.g. a menu selection, text string, spot position etc.) to the program. The active strip consists of a square at the left hand side and a rectangle at the right hand side, usually stretching across the width of the view-object. When the program is ready to receive input from the menu, then the square is filled with green (or black on a black and white display) and a message is displayed in the rectangle. When the program is not waiting to receive input then both parts of the active strip are cleared. A program may be waiting to receive input from more than one view-object at a time and from different view-objects at different times and hence the reason for indicating to the user the current 'active/inactive' state of any particular view-object.
Figure 2.1 An active strip in it's active state

2.3 THE BASE FRAME VIEW-OBJECT
This is just an empty 'top level' window on which other view-objects may be laid out. The window manager will usually add a frame of some kind round such a window and its exact appearance will therefore depend on the system on which the program is being run. Frequently the added frame will display a title which has been supplied by the application programmer. The endpiece illustrates the program 'Lauespots' which has a base-frame view-object containing four other view-objects. Any operations on the base frame (e.g. moving it or resizing it) are functions of the particular window manager which is running.
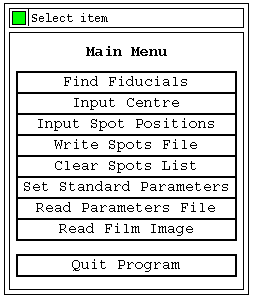
2.4 THE MENU AREA VIEW-OBJECT
The menu area view-object provides an area containing a menu from which items may be selected by the user by means of the mouse. Typically, an application will use the same menu area for a series of different menus. The menu area has an optional title. It also has an optional extra menu item situated below the other menu items and separated from them. This item is typically used either as a 'Quit' item or as an item which will instruct the program to return to the previously displayed menu. The menu area also has an 'active strip' at the top of the area. When the program is waiting for a menu item to be selected then this will display the message 'Select item'.
Figure 2.2 Example of a menu area view-object
When the menu area is in its 'active' state and the mouse pointer is is within the boundary of a menu item, then that item will be highlighted by changing the background to the colour cyan (on a colour display) and displaying the item name in bold print. A menu item is selected by pointing to the item and clicking Button1 of the mouse.
The menu items may use a number of different font sizes which may depend on the length of the item names to be displayed.
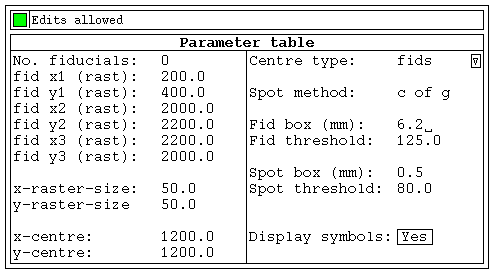
2.5 THE PARAMETER TABLE VIEW-OBJECT
The parameter table view-object provides an area containing an editable table of parameter values. The parameter table has an optional title. The table itself consists of one or more columns, each with a number of rows containing a parameter name and a parameter value. The parameter table has an 'active strip' (see section 2.2) at the top to indicate when the entries may be edited. When the program is prepared to service parameter value edits, then the message 'Edits allowed' is displayed in the active strip. An example is shown in Fig. 2.3 below.
Figure 2.3 Example of a parameter table view-object
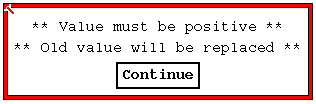
When the parameter table is in 'active' mode and the mouse pointer points at an item in the table, then that item will be highlighted by changing the background to the colour cyan (on a colour display) and displaying the parameter name and value in bold print. The parameter value for the highlighted item may be changed by clicking Button1 of the mouse. The value string is cleared and a cursor is displayed. The user types in the new value and inputs it to the program by hitting the 'Return' or 'Enter' or 'Linefeed' key. While a value string is being input, incorrect characters may be deleted by hitting the the 'Delete' or 'Backspace' key. A value string selected on another window may be pasted in by pressing Button2 when the value input is awaited. The user may abandon the input of the new value by hitting the 'Escape' key, in which case, the old value will be restored. If a new value is input, then it will normally be checked by the application program which will decide what course of action is taken. Usually, if an invalid input was given, the program will use the function which causes a 'popup notice' to be displayed. This will contain an error message and the message '** Old value will be replaced **'. To proceed, the user must select the 'Continue' box within the popup notice by pointing to that box (on a colour display it will then be highlighted with a green background) and clicking Button1 of the mouse. The old value will then be restored.
When inputting a new parameter value, the parameter table window must have the keyboard focus. It will automatically gain the keyboard focus when the mouse Button1 is clicked to change a parameter value. If required, the keyboard focus may be restored to the window by pointing to the window and clicking Button1 of the mouse. When the parameter table has the keyboard focus, the message in the active strip is displayed in bold print and, when it has lost the keyboard focus, the message in the active strip is displayed in normal print.
Parameter values longer than the displayed value field may be used. In this case the value field may be scrolled by pointing to the value, holding down Button2 and moving it to the left or right within the value field. Moving the pointer to the left will move towards the start of the value string and moving it to the right will move it towards the end of the value string. Button2 is released to finish the scrolling. When the value string extends beyond the displayed field, this is indicated by an arrow mark at the appropriate end or ends. The maximum allowed length for the value string is set under program control and the program also determines whether or not value string scrolling is allowed.
In some cases, parameter values may be displayed as 'toggle' values. These are either a 'Yes/No' toggle or an 'On/Off' toggle. The toggle value is displayed enclosed in a box. When an item with a toggle value has been highlighted and when Button1 of the mouse is clicked, then the value will switch to its alternative, 'Yes' to 'No' or vice versa or 'On' to 'Off' or vice versa.
Alternatively, some items in the parameter table may have drop down menus associated with them. These have a menu button at the right hand side of the parameter value field (see for example the item Centre-type in Fig 2.3). An option is selected from the drop down menu as follows:
   Either:    Point to the menu button;
              Hold down Button3 of the mouse;
              Move the pointer to the required option on the menu;
              Release Button3 of the mouse to select the option.

   Or:        Point to the menu button;
              Click Button3 of the mouse;
              Move the pointer to the required option on the menu;
              Click Button1 or Button3 of the mouse to select the
              option.

      If Button1 or Button3 of the mouse is clicked with the pointer off
      the menu then the option selection will be abandoned and the  drop
      down menu will disappear.
A third special type of item may have a step button associated with
them. This is indicated by a square box at the right hand side of the
parameter value divided in two by a diagonal line. Pointing to one
half of the button, highlights that half of the button and clicking
Button1 will initiate the parameter value change. The actions taken
by clicking Button1 on one half of the box are under program control
but are intended to step up (top right half) or down (bottom left
half) through a set of parameter values or to increment/decrement
a counter. Using Button 3, the step button acts as a drop down menu
indicating the two options available; one of these may be selected as
described above.
Sometimes, the application may choose to emphasise certain items by displaying them in bold print, perhaps to bring particularly important items to the attention of the user. These emphasised items are treated in exactly the same way as the items in normal print. (There would however be no change in the appearance of such items when the mouse pointer points to them on a black an white display).
Sometimes the application may choose to make some items 'silent'. These are effectively removed from the display and cannot be seen or modified until restored by the program.
There is also an option to have labels in the parameter table, perhaps introducing a related group of items. These have a name but no value and will never be highlighted or selected.
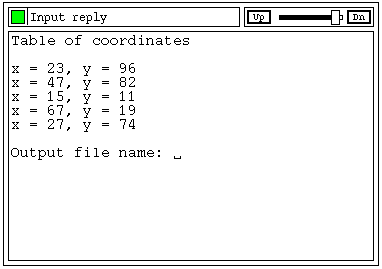
2.6 THE I/O WINDOW VIEW-OBJECT
The I/O window view-object provides an area for the simple output of text from the program and input of text strings by the user when required (e.g. for a question and answer sequence). The I/O window has an 'active strip' (see section 2.2) at the top to indicate whether or not the program is waiting for a reply string to be input by the user. When the program is waiting for input, then a message ('Input reply' by default) is displayed in the active strip.
Figure 2.4 Example of an i/o window view-object
When the program is waiting for the input of a text string, then a text cursor will be displayed at the point where the next character is to be input. The input of a text string is completed by hitting the 'Return' or 'Enter' or 'Linefeed' key. While a text string is being input, incorrect characters may be deleted by hitting the the 'Delete' or 'Backspace' key. During the input of the reply, further simple editing is also available; The cursor position may be moved within the string using the left and right cursor (arrow) keys; new text may be inserted at the cursor position by typing them in from the keyboard or the character before the cursor may be deleted by hitting the 'Delete' or 'Backspace' key.
Long text strings will wrap around onto successive lines as needed and the text will scroll up when the bottom of the window is reached.
When inputting the characters of a text string, the I/O window must have the keyboard focus. It will automatically gain the keyboard focus when the text string input is first requested. If required, the keyboard focus may be restored to the window by pointing to the window and clicking Button1 of the mouse. When the I/O window has the keyboard focus, the message in the active strip is displayed in bold print and, when it has lost the keyboard focus, the message in the active strip is displayed in normal print.
When input is requested, previous commands may be recalled by hitting the Up arrow (cursor) key; each press of the key goes one futher back in the previous commands list. Pressing the Down arrow (cursor) key moves forward through the list. The latest 50 commands are stored.
When a reply is to be input, text which has been 'selected' on another or the same window, may be pasted into the reply field by clicking Button2. Note that if the selected text contains more than one line, then only the text up to the first newline character will be pasted in.
Text may be 'selected' from an I/O window for pasting into the same or another window. This is done by pointing to the first character of the text to be selected, holding down Button1, dragging the pointer to the last character of the text to be selected and then releasing Button1. The selected text will be displayed in reverse video. To de-select the text, point to the window and click Button1 without dragging the pointer.
An option is normally available to move back and forward through pages which have been output. Select the 'Up' button to move back a page or the 'Dn' (down) button to move forward a page or alternatively move the slider to the left to move back through the stored pages or to the right to move forward through the pages (full details of how manipulate these items are given in chapter 3). The maximum number of previous pages stored is under program control.
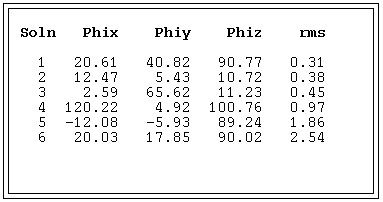
The text table window view-object provides an area for the simple output of text from the program, particularly for tabular data. There is no scrolling. The text may be in bold or normal print in a variety of colours. The program may output text at any character position within the window and areas of the window may be cleared and redrawn as required. A limited series of symbols are also available. There is am option to create a text table with cells defining areas of text which may be highlighted and, when required, selected using the mouse.
Figure 2.5 Example of a text table view-object
2.7 THE GRAPHICS WINDOW VIEW-OBJECT
The graphics window view-object provides an area for the output of graphics. A number of routines are supplied to give access to a basic set of line plotting functions including drawing of rectangles, polygons and arcs. Filled areas may also be drawn. Symbol and text plotting functions are also available and there are two simple axis drawing routines. An option is available to produce Postscript files from the plots in order to obtain hard copies. Sections of the plot may be identified by an graphics object groupidentifier enabling parts of the plot to be deleted or redrawn under program control. Simple cursor input is provided. A number of options are available for defining the mapping of the user coordinates onto the window and for handling possible re-sizing of the graphics window. When plotting, a current graphics style is used; this determines the colour, the line width and the X-font to be used. This style may be changed when required. The text fonts are either the the standard XDL_VIEW fonts (for horizontal text only) or a simple internal scaleable font allowing text to be drawn of any size or at any angle.
Figure 2.6 Example of a graphics window view-object
If the program requires the input of a cursor position, then the active strip button will be highlighted and a message will be displayed in the active strip. The position is input by moving the pointer to the required position in the graphics area and clicking Button1.
To obtain hard copy output in the form of a Postscript file, select the 'PS' button. A panel i/o item will be displayed at the top of the graphics area (full details of how to manipulate panel items are given in chapter 3) and the following question and answer sequence will be entered.
- Postscript file name:
- The reply is the name of the Postscript file to be written.
- Portrait or Landscape [p]:
- The reply is 'p' if the output plot is to be in portrait
format (the default) or 'l' if it is to be in landscape
format.
- Colour Postscript [y]:
- The reply is 'y' (the default) if the colours are to be preserved
in the postscript file. If the reply is 'n' then all colours (except
white) will be drawn in black.
- Add further annotation [y]:
- Reply with 'y' (the default) if further annotation is required
or 'n' if it is not. If the reply is 'n' the question and
answer sequence is terminated at this stage.
- Add heading with date [y]:
- Reply with 'y' (the default) to output a standard heading including
the date of the plot or with 'n' if this heading is not required.
- Add comments [y]:
- Reply with 'y' (the default) if user comments are to be added to the plot or 'n' if they are not. If the reply is 'n' the question and answer sequence is terminated at this stage. If the reply is 'y' then up to 4 lines of comment may be input following the ':' prompts.
2.8 THE POP-UP NOTICE VIEW-OBJECT
The pop-up notice view-object is used to bring important information to the user's attention. The program will only proceed after the user has selected one of the buttons displayed within the notice. It is typically used to indicate error conditions or to request confirmation for a possibly dangerous choice made by the user.
Figure 2.7 Example of a pop-up notice view-object
The pop-up notice is surrounded by a thick red border (or black on a black and white display). There may be an arrow displayed at the top left hand corner of the box, in which case this corner should be situated on the screen close to the item on the screen relating to the condition causing the pop-up notice to be used (e.g. an item in a parameter table for which an invalid value was input).
The pop-up notice will contain one or two message strings and one or two buttons. The user selects a button by pointing to the required button and then clicking Button1 of the mouse. On a colour display, when the mouse pointer points to a button, the button will be highlighted with a green background, if there is only one button, or with a green or red background, if there are two buttons.
2.9 THE POP-UP DIALOGUE BOX VIEW-OBJECT
The pop-up dialogue box is used to input some immediate information into a program as a text string in response to a prompt. When such a box appears the user must respond to it before anything else can be done.
Figure 2.8 Example of a pop-up dialogue box view-object
The box has, in general, a thick blue border (black on a monochrome display) and contains a prompt area to the left and a reply area to the right. The reply area will scroll left and right if required to enable a reply, which is longer than the length of the displayed reply area (up to a maximum length as set by the program for that reply) to be input. The reply area has a text cursor displayed. The user may delete characters to the left of the cursor by pressing the 'Delete' or 'Backspace' keys. Characters typed in will be added at the current cursor position allowing insertion of text if the cursor is not at the end of the reply. The cursor may be moved to left or right using the left and right arrow keys. The input is completed by pressing the 'Return' or 'Enter' or 'Linefeed' key. When the input has been completed, the dialogue box will be removed from the screen.
Input may be abandoned and the dialogue box dismissed by pressing the 'Escape' key.
2.10 THE POP-UP MENU VIEW-OBJECT
The popup menu is used to request the immediate selection of a menu item. When such a pop-up menu appears the user must respond to it before anything else can be done.
Figure 2.9 Example of a pop-up menu view-object
The pop-up menu normally has a coloured border (blue is recommended). When the the mouse pointer is is within the boundary of a menu item, then that item will be highlighted by changing the background to the colour cyan (on a colour display) and displaying the item name in bold print.
If Button1 or Button3 is held down when the menu is popped up then:
- First release of the button on the menu selects item.
- First release of the button off the menu leaves menu displayed and then.
- Click Button1 or Button3 on the menu to select item.
- Click Button1 or Button3 off the menu to dismiss menu.
- Click Button1 or Button3 on the menu to select item.
- Click Button1 or Button3 on the menu to select item.
- Click Button1 or Button3 off the menu to dismiss menu.
2.11 THE POP-UP FRAME VIEW-OBJECT
A popup frame is used to request some immediate input from the user. When such a pop-up frame appears, the user must respond to it before anything else can be done. The frame has a thin external black border and optionally an internal coloured border. The frame will contain one or more view-objects (such as a menu area, parameter table etc.) with at least one means of exit.
2.12 THE PROGRESS BAR VIEW-OBJECT
The progress bar view-object is used to indicate the progress of a time consuming operation e.g. reading in of a large file or performing a lengthy calculation. The progress bar is a window containing a title and the bar itself. The bar starts a an empty rectangle which is gradually filled in blue (or black on a black and white display) as the operation proceeds. The program needs to be able to pass the current degree of progress to the view-object at reasonably frequent intervals for its use to be effective.
Figure 2.10 Example of a progress bar view-object
2.13 THE BLANK OBJECT VIEW-OBJECT
This is merely a window with a surrounding border similar to that used in other view-objects which may be output on a display for aesthetic reasons to indicate the position on a tiled display which will be occupied by another view-object later.
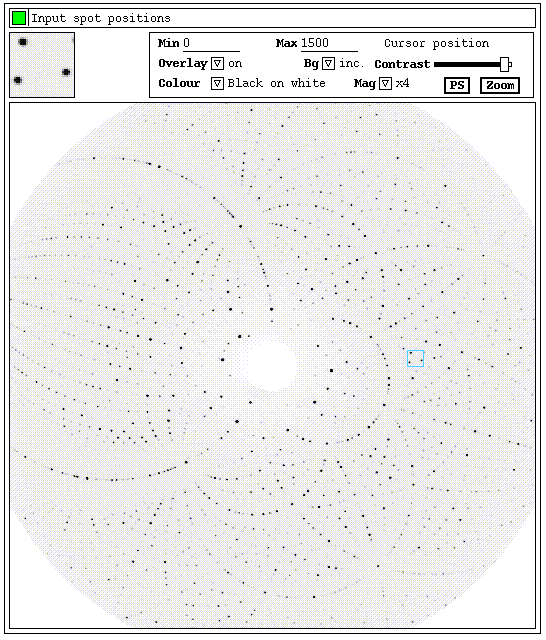
2.14 THE IMAGE VIEW-OBJECT
This view-object is designed specifically for displaying film or image-plate images used in Protein Crystallography. It may be used for measuring spot positions and has facilities for overlaying symbols, boses, other vectors or text on top of the displayed image. A magnifying window within the view-object shows a magnified version of a portion of the image from the main image display area. The image may also be zoomed. A control panel allows for a series of adjustments to the display.
Figure 2.11 Example of an image view-object (image plate)
The image view-object has an 'active strip' (see section 2.2) at the top to indicate when program is waiting for the input of spot or symbol positions or possibly a user selected rectangle. When the program is waiting for such input, a message is displayed in the active strip indicating the nature of the input required e.g. the default message 'Input spot positions'.
The main image display area at the bottom of the view-object displays the image using a gray or colour scale palette. It may also be overlayed by symbols when the program requires it e.g. to mark the image centre position or to display a predicted spot pattern.
The magnifying window area (top left below the active strip) shows an enlarged section from a small part of the image in the main display area. The portion of the image magnified normally follows the cursor position on the main image display area though its position may be fixed when required. There is an option for doubling the size of the magnifying window. When this is done the magifying window overlays the top left hand corner of the main image display area.
The control panel area is situated at the top right of the view-object below the active strip.
The control panel contains the following panel items:-
- A slider to control the contrast in the displayed image
- A label indicating the cursor position (or pixel intensity)
- A drop down menu to select overlaying options
- A drop down menu to select the image display colour options
- An optional drop down menu to select the bakground handling options
- A drop down menu to select the magnification for the magnifying window
- Two value items for minimum and maximum scaling thresholds
- A button to request a Postscript dump of the main image display
- A button to initiate zooming of the image
xdl_image.cursor: largeThe label at the top right of the control panel displays the current cursor position as a pixel position within the full image as contained in the image data file. The displayed image will frequently have several pixels from the original image compressed into one and may possibly only represent a section of the complete image. When the cursor is outside the main image display area and the magnifying window area, the label displays the message 'Cursor Position'. When an image has been compressed before display then the pixel position is calculated as the one which would be closest to the centre of the pixel selected by the cursor position.
When pixel positions are to be input to the program, then the active strip will indicate the 'active' mode and will display a message. Pixel positions are input by moving the cursor to the appropriate position, either on the main display area or on the magnifying window, and clicking Button1 of the mouse.
When the cursor is within the main image display area, clicking on the mouse Button2 will alternately freeze and free the magnifying window display. In the 'free' state (the default), the magnifying window will show a magnified image of an area around the current cursor position and the display will change as the cursor is moved. In the 'frozen' state the magnifying window will display a magnified image of the area around the position of the cursor when Button2 was clicked to freeze the magnifying window. A light blue square on the main image display shows the position and approximate size of the frozen area displayed in the magnifying window. In the 'free' state, the display in the magnifying window merely enlarges the image in the main display with each pixel being reproduced a number of times depending on the magnification. In many cases the displayed image will have been compressed from the original image with loss of detail; for this reason, when an area is frozen, the full image data will be accessed to allow for the portion of the image to be displayed in as much detail as possible.
To change the size of the magifying window between its two possible sizes, point to the magnifying window and click Button2.
It may be noted that, when symbols have been overlayed on the main image display area, they will also appear on the magnifying window though they will not be magnified in size. Any other overlayed vectors will be magnified without any thickening of the lines. When the cursor is on the magnifying window, clicking Button2 will alternately cause the magnifying window to be doubled and halved in size. When in double size, it will overlay part of the main image.
The intensity of a pixel may be found by moving the cursor to the required position, either in the main image display area or in the magnifying window area, and holding down Button3 of the mouse. The intensity will be displayed in the label section at the top right of the control panel area. Note that if the cursor is moved while Button3 of the mouse is held down, the pixel intensity will be continuously updated to that at the current pixel position. If the image is zoomed sufficiently, then, for a gray scale image, the intensity values will be shown on the individual pixels in the main display area; this happens (provided that the program has requested the option) if the size of the individual displayed pixels is sufficiently large for the intensity values to be written within the pixels; black text is used on light pixels and white text on dark pixels.
When a rectangular area from the main image display is to be selected, then the active strip will indicate the 'active' mode and will display an appropriate (under program control) message. The user points to one corner of the rectangle, presses and holds down Button1 of the mouse and drags it to the opposite corner of the required rectangle. Button1 is the released and the selected rectangle will be returned to the calling program. During the selection, the current state of the rectangle will be outlined on the display. If the user is not happy with the rectangle being selected then the selection can be dismissed by clicking on Button2 before Button1 has been released. Button1 is then released and a new selection may be made.
Control Panel Options
The following paragraphs describe the options which may be selected via the control panel. Full details of how to manipulate the panel items are given in Chapter 3 of this volume
- Contrast Slider
This slider controls the contrast on the displayed image from minimum at the left to maximum at the right hand side of the slider bar. The position is ignored if a user defined or random colour display has been selected via the colour choice menu.
On a monochrome display, a threshold slider replaces the contrast slider and is labelled 'Thresh' (see also (d) below).
- Colour Choice Menu
This is a panel choice item (title is 'Colour') with a drop down menu enabling the selection of a number of options for the colouring of the image display. The following choices are available.
- Black on white
- This gives a 64 level gray scale with
increasing blackness as the pixel values increase.
- White on black
- This gives a 64 level gray scale with
decreasing blackness as the pixel values increase.
- Yellow if >Max
- This is the same as the above except that
the top level of the gray scale is replaced by yellow.
- Colour 1
- This gives a colour scale of 64 colours
ordered yellow-orange-red-purple-blue and
getting darker as the pixel values increase.
- Colour 2
- This gives a colour scale of 64 colours
ordered blue-purple-red-orange-yellow and
getting lighter as the pixel values increase.
- User defined
- The program may set a user defined colour
map of 64 colours. This may be changed
under program control as needed. The
view-object has a default if none has
been defined via the calling program.
- Random colour
- This selects a 64 colour map with a random selection of colours. Each time this item is selected, a new random colour map will be selected. Moving the contrast slider or clicking Button1 on its box will also select a new random colour map.
'Black on White' is the default choice.
On a monochrome display only the first two options will appear on the menu.
- Black on white
- Magnification Factor
This is a panel choice item (title is 'Mag') with a drop down menu enabling the selection of a number of options for the magnifying factor to be used for the magnifying window. The following choices are available.
           x2
           x3
           x4
           x5
           x6
           x7
           x8
These give magnification factors from 2 to 8. The default magnification is 4.On a monochrome display, three extra items are present. These give half-tone simulations of a ten level grayscale in the magnifying window. The extra items are x3G, x6G, and x9G.
- Overlay Options
This is a panel choice item (title is 'Overlay') with a drop down menu enabling the selection of a number of options for the display of overlays (symbols drawn on the image) when present.
Two different options may be presented (under program control). In both cases overlayed symbols may belong to one of two sets.
For the first option, the following choices are available.
- on
- The overlayed symbols are displayed on the
main image display and on the magnifying window.
- off
- The overlayed symbols are not displayed.
- offset
- The overlayed symbols are displayed on the main image display and on the magnifying window but the symbols of the overlay set 1 are offset by a constant amount from the actual positions to which they refer. This may sometimes be useful when, for example, a predicted pattern is displayed as an overlay. In such a case the predicted pattern symbols would be assigned to overlay set 1 and any symbols marking observed spot positions would be assigned to overlay set 2. By default the offset is to the left and down by 4 pixels in each direction on the main image display area though some programs may set other offsets.
For the second option, the following choices are available.
- on
- The overlayed symbols are displayed on the
main image display and on the magnifying window.
- off
- The overlayed symbols are not displayed.
- ov1 on
- Only the symbols belonging to the overlay set 1 are displayed.
- ov2 on
- Only the symbols belonging to the overlay set 2 are displayed.
The default overlay option is 'On' for both cases.
- on
- Minimum and Maximum Threshold Values
Editable minimum and maximum threshold values, for scaling the displayed image, are shown in panel value items (labels 'Min' and 'Max') on the control panel. The range of pixel values between the minimum and maximum values is divided into 64 equal parts for display using the 64 gray or colour levels selected. Pixel values lower than the minimum value are displayed as for the minimum value and pixel values greater than the maximum value are displayed as for the maximum value. The program ensures that the maximum threshold value is at least one greater than the minimum threshold value and also that the minimum and maximum threshold values are within the range of pixel values in the image. Incorrect input values will be reset by the program. (For monochrome displays, the position of the Threshold slider sets the display theshold level within the selected range; e.g. if min_thresh = 40, max_thresh = 200 and the slider is 3/4 of the way to the right, the display threshold level will be 120 [(3/4)*(200-40)].
- Background Options (optional - under program control)
If present, the background handling options panel choice item is labelled 'Bg'. The calling program must calculate a background image the size of the main displayed image and pass this to the image view-object. The following choices are available:
- inc.
- The image is presented without any
background subtraction being performed.
- sub.
- The background subtracted image is displayed.
- only
- The backgound image is displayed.
- inc.
- Zoom Option
This button is used to zoom the image. When selected, a message appears on the main image display area telling the user to select the area to be zoomed and the button label changes from 'Zoom' to 'Full'. The user may then select the required area by pointing to the top left of the required area, holding down Button1 of the mouse and dragging it to the opposite corner of the required area. Releasing Button1 will initiate the zoom. (If Button2 is clicked during this procedure, the current selection will be cancelled and the user may then select another area). The exact area zoomed may differ slightly from that selected and in particular the aspect of the area selected will be the same as that of the current image display area. To re-display the original image, select the zoom button (labelled 'Full') instead of selecting an area on the image. Note that pixel positions may be selected from a zoomed image when required.
- Postscript Output
The user may obtain a postscript file (for a black and white printer) or colour postscript file of the image currently displayed in the main display area. This will include any symbols etc. currently displayed. For the black and white postscript, the contrast slider is ignored (a maximum setting is assumed) and overlay symbols will be drawn in black. For a colour postscript file, all colours will be obtained from those currently displayed. Various options for annotating the plot are available.
The option is selected by pointing to the PS button and clicking Button1 of the mouse. A panel I/O item is displayed and a question and answer sequence is entered. The user may abandon the option by pressing the 'Escape' key.
When an operation within the view-object may take a significant amount of time the message W O R K I N G may appear at the top right of the control panel. This should prevent the user retrying options which are, in fact, being acted on currently. Such retrys would be queued and acted on in sequence thus causing extra delay.
Facilities are available within the view-object and related software to enable input of image data in any of the eight possible orders and to display it with the axes again in any of the eight possible combinations. When several pixels are combined into one then, under program control, the contributing pixels may either be averaged or just sampled.
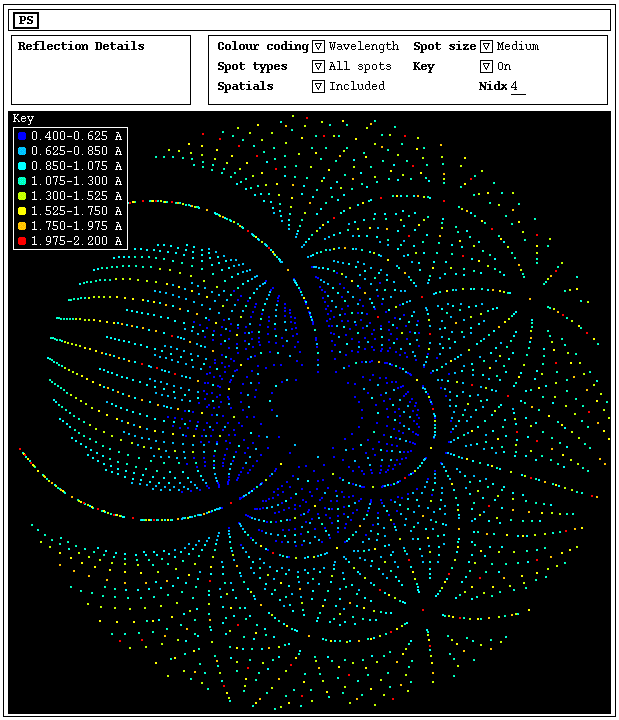
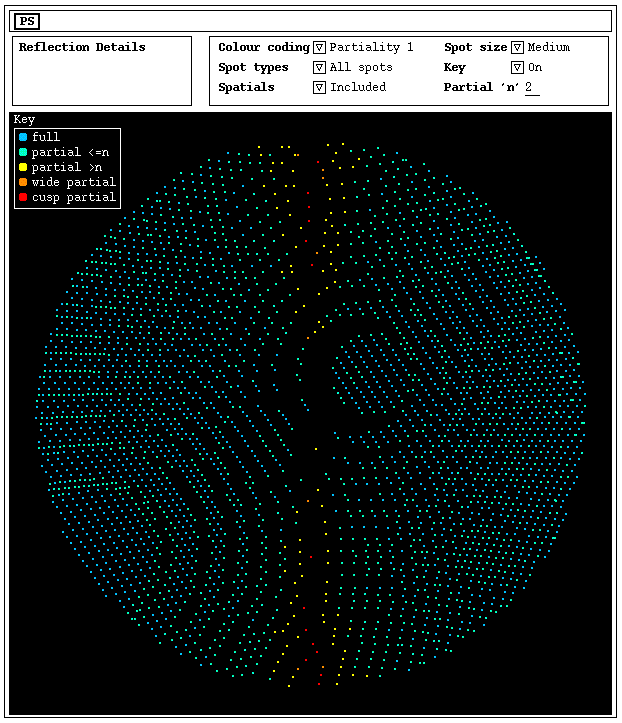
2.15 THE LAUE SIMULATION DISPLAY VIEW-OBJECT
This view-object was written for specific use within one of the programs of the Daresbury Laboratory Laue Software Suite. It is used for displaying simulations of Laue diffraction patterns. It has basically two modes of display, a colour mode and an interactive mode. In each mode there is a display area for the simulation, an area to list details of a selected spot, a control panel area and an area used for requesting hard copy (Postscript) prints of the simulations. The Laue simulation view-object also has options for Gnomonic projections to be simulated in either of the display modes.
Figure 2.12 Example of a colour Laue simulation
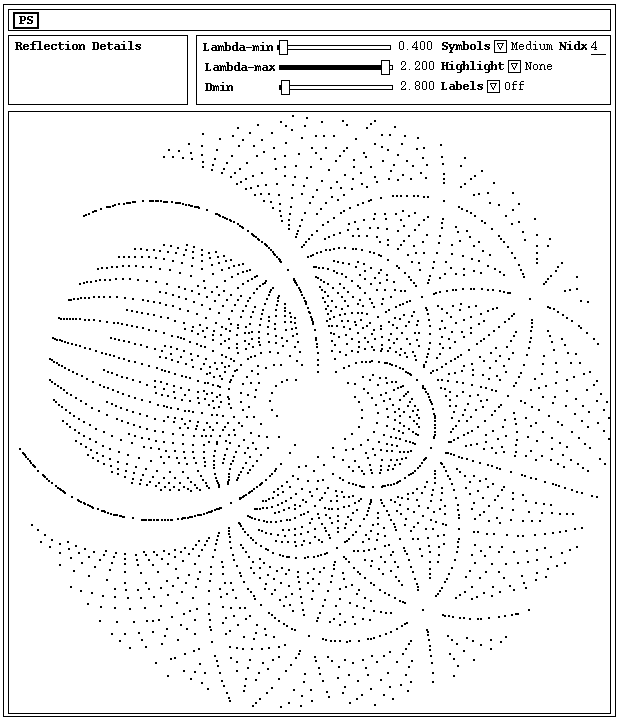
Figure 2.13 Example of an interactive Laue simulation
- Colour Display
When this option is selected, the Laue simulation is displayed as coloured spots displayed on a black background. Various options may be selected via the control panel items (full details of how to manipulate these items are given in chapter 3). Also, details may be listed for selected spots and hard copy Postscript file plots produced if required.
Control Panel Options
The colour coding depends on the option selected via the Colour coding choice menu on the control panel. The options available are:
- Wavelength
- The wavelength range is split into eight ranges
which are identified by eight different colours
on a scale running from blue (low wavelength)
to red (high wavelength). Multiple spots are
colour coded by their highest wavelength
component.
- Multiplicity
- The spots are colour coded by multiplicity as follows:
blue: singles cyan: doubles yellow: triples red: multiplicity > 3 - Wavelength/Multiplicity
- The singles are colour coded as for the
first option and multiples are coloured white.
- Nodality
- Non-nodal spots are coloured blue and nodal spots are coloured yellow. The nodal index may be set via the 'Nidx' value item on the control panel and has a default starting value of 4.
The 'Spot types' choice menu on the control panel allows the user to choose one of the following three options:
- Display 'all' spots i.e. singles and multiples
- Display singles only
- Display multiples only
The display of spatially overlapped spots may be controlled via the 'Spatials' choice menu on the control panel. There are three options:
- Display all spots including spatially overlapped spots
- Exclude spatially overlapped spots
- Display the spatially overlapped spots only
The user may select one of three spot sizes, small medium or large for the display via the 'Spot size' choice menu on the control panel.
The display, of a key at the top left of the display area showing the colour coding, may be turned on or off via the 'Key' choice menu on the control panel.
The nodal index, used in deciding whether or not a spot is a nodal for the plot colour coded by nodality, can be reset via the 'Nidx' value item on the control panel. The value must be in the range 0 to 12.
Listing Spot Details
When the mouse Button1 is pressed with the cursor on a spot position, details of that spot will be listed in the spot details area. The following information is listed:
- The indices
- (highest indices component for a multiple)
- The wavelength
- (lowest component for a multiple)
- The multiplicity
- 1 for a single; for multiples the value is
followed by the numbers of the minimum and
maximum harmonics present relative to the
nodal indices for the spot (numbered from
1 = the fundamental).
- The coordinates
- The 'film' xf, yf coordinates in millimetres from the centre of the pattern.
Hard Copy
To get a hard copy plot in the form of a Postcript file, select the panel button marked PS in the hard copy request area at the top of the view object. A question and answer sequence is then followed using a panel i/o item to the right of the PS button. Invalid replies will give pop-up error notices. The hard copy output may be abandoned by pressing the Escape key when a prompt is displayed. The question and answer sequence is as follows:
- Postscript file name:
- This reply is the name of the output Postscript file.
- Spot diameter in mm [x.x]:
- This gives the required spot size for
the spots which need not be the same
as that on the display. The default
value given is an approximate match
to that currently being used on the
display. The reply must be in the range
of 0.1 mm to 10.0 mm.
- Add key [y]:
- This enables the user to choose whether
(the default) or not to display a
key on the output plot. This key, with
some additional information describing
the nature of the plot, will be output
below the actual Laue simulation.
- Comment:
- Up to 150 characters of comment may be input. The comment will be automatically split into lines if needed.
Note: On monochrome displays, these Laue simulations are of limited use as all the colours in the colour scales are represented by white. However any hard copy requested will have the normal colour representations in it.
- Wavelength
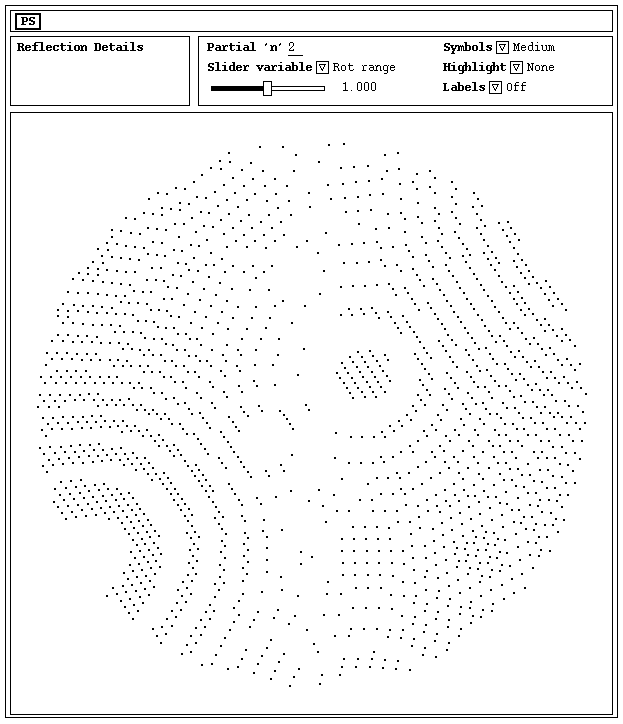
- Interactive Display
When this option is selected, the Laue simulation is displayed as black spots displayed on a white background. Various options may be selected via the control panel items (full details of how to manipulate these items are given in chapter 3). These include options to vary the soft limits via sliders, options to highlight various classes of spots and options to label selected spots. Also, details may be listed for selected spots and hard copy Postscript file plots produced if required.
Control Panel Options
Three panel slider items are present which enable the user to see, in an interactive manner, the effect of varying the soft limits lambda-min, lambda-max and dmin. They were designed for use on colour displays which have 'writeable colour maps'. In fact 50 colours are used on the display with the spots being colour coded by wavelength or dmin depending on the slider currently selected. The 50 colours are then set to white or black depending on the position of the currently selected slider. If the slider is moved then the display is altered merely by changing the colours in the colour map thus giving a rapid change of pattern as the slider is moved. When changing from one slider to another, it is necessary for the program to perform some additional calculations and to redraw the pattern; it is recommended therefore that, when changing to a new slider, the user should first click Button1 on the grip box of the slider so that the redrawing is done before the new slider is moved. On displays which do not have writeable colour maps and on monochrome displays, the use of the sliders is less effective as the pattern needs to be redrawn each time a slider is moved.
The current values for lambda-min, lambda-max and dmin are displayed to the right of their respective sliders. The starting limits and step intervals are defined by the calling program.
The 'Highlight' choice menu on the control panel may be used to enable various classes of spots to be highlighted. The options available are as follows:
- No highlighting
- This is the default; all spots are shown as black spots.
- Highlight multiples
- Doubles are indicated by blue vertical
crosses; higher multiples are indicated
by red stars (on monochrome displays, the
corresponding symbols are drawn in black)
- Highlight nodals
- Nodal spots are indicated by red vertical crosses (or black on a monochrome display). The nodal index may be set via the 'Nidx' value item on the control panel and has a default starting value of 4.
Note: When spots are highlighted and the soft limit sliders are used, the plot will be redrawn each time a slider is moved. The sliders are best used when no spots are highlighted.
The user may select one of three spot sizes, small medium or large for the display via the 'Symbols' choice menu on the control panel.
The nodal index, used in deciding whether or not a spot is a nodal for the plots with nodals highlighted, can be reset via the 'Nidx' value item on the control panel. The value must be in the range 0 to 12.
The 'Labels' choice menu allows a number options for labelling. These are:
- Labels off
- No labels will be displayed and the
labelling facility is currently disabled.
- Minimum hkl
- When a spot is labelled and the spot is a
multiple, show the indices of the component
with the lowest indices.
- Maximum hkl
- When a spot is labelled and the spot is a
multiple, show the indices of the component
with the highest indices.
- Nodal hkl
- Show the nodal indices for the spot on the label.
If there are labels already displayed when a new labels option is selected, the existing labels will be redrawn as needed.
Note: When labels are displayed and the soft limit sliders are used, the plot may be redrawn when a slider is moved. This may because the relevant displayed indices have changed or because a labelled spot has disappeared or reappeared. The sliders are best used when no labels are displayed.
Listing Spot Details
When the mouse Button1 is pressed with the cursor on a spot position, details of that spot will be listed in the spot details area. The following information is listed:
- The indices
- (highest indices component for a multiple)
- The wavelength
- (lowest component for a multiple)
- The multiplicity
- 1 for a single; for multiples the value is
followed by the numbers of the minimum and
maximum harmonics present relative to the
nodal indices for the spot (numbered from
1 = the fundamental).
- The coordinates
- The 'film' xf, yf coordinates in millimetres from the centre of the pattern.
The selected spot is marked by a surrounding red circle on the display area (black on a monochrome display). The selection may be removed by clicking Button1 when the cursor is within the display area but not pointing to a spot. When Button1 is pressed, the nearest spot to the cursor is selected provided that the distance squared (pixels) to the spot is no more than 18.
The spot details are also listed when a spot is labelled.
Labelling Spots
Providing that one of the labelling options has been selected via the 'Labels' choice menu, spots may be labelled on the plot as follows:
- Move the cursor to the required spot.
- Press and hold down Button2 of the mouse.
- Move the mouse till the label is in the required position.
- Release Button2 of the mouse.
A line is drawn from the nearest corner of the box surrounding the label to the labelled spot. When a label is being positioned, this line is shown while the label is near to the spot but if the label is moved far from the spot, then instead of the line, the spot position is marked with a large cross and the label is detached; when Button2 is released, the cross is removed and the attaching line is drawn.
Labels may moved as follows:
- Move the cursor onto the label to be moved.
- Press and hold down Button2 of the mouse. Note that when
Button2 is pressed, the plot will be redrawn.
- Move the mouse till the label is in the required position.
- Release Button2 of the mouse.
Labels may be deleted as follows:
- Move the cursor onto the label to be deleted.
- Click Button3 of the mouse.
Hard Copy
To get a hard copy plot in the form of a Postcript file, select the panel button marked PS in the hard copy request area at the top of the view object. A question and answer sequence is then followed using a panel i/o item to the right of the PS button. Invalid replies will give pop-up error notices. The hard copy output may be abandoned by pressing the Escape key when a prompt is displayed. The question and answer sequence is as follows:
- Postscript file name:
- This reply is the name of the output Postscript file.
- Standard (s) or absolute (a) scale [s]:
- With standard scaling, the simulation
will be 18 cm square. For absolute
scaling, the plot will be on the
actual scale as determined by the crystal
to film distance. If this gives a plot
larger than 18 cm square, then a warning
message will be given and the plot
will be clipped.
- Spot diameter in mm [x.x]:
- This gives the required spot size for
the spots which need not be the same
as that on the display. The default
value given is an approximate match
to that currently being used on the
display. The reply must be in the range
of 0.1 mm to 10.0 mm.
- Symbol size in mm [x.x]:
- This question is only asked if spots
are being higlighted on the current
plot. This gives the required size for the
symbols to be drawn on the plot; these
symbols need not be the same size
as those on the display. The default
value given is an approximate match
to that currently being used on the
display. The reply must be in the range
of 0.5 mm to 10.0 mm.
- Use coloured symbols [n]:
- This question is only asked if spots
are being higlighted on the current
plot. By default the symbols on the
hard copy will be plotted in black
but coloured symbols may be requested
if desired.
- Comment:
- Up to 150 characters of comment may be input. The comment will be automatically split into lines if needed.
- No highlighting
2.16 THE ROTATION SIMULATION VIEW-OBJECT
This view-object was written for specific use within the ROTGEN program written at the Daresbury Laboratory. It is used for displaying simulations of monochromatic rotation image X-ray diffraction patterns. It has basically two modes of display, a colour mode and an interactive mode. In each mode there is a display area for the simulation, an area to list details of a selected spot, a control panel area and an area used for requesting hard copy (Postscript) prints of the simulations.
Figure 2.14 Example of a colour rotation simulation
Figure 2.15 Example of an interactive rotation simulation
- Colour Display
When this option is selected, the rotation simulation is displayed as coloured spots displayed on a black background. Various options may be selected via the control panel items (full details of how to manipulate these items are given in chapter 3). Also, details may be listed for selected spots and hard copy Postscript file plots produced if required.
Control Panel Options
The colour coding depends on the option selected via the Colour coding choice menu on the control panel. The display is qualified by the settings of other control panel items. The options available are:
- Fulls/partials
- The spots are split into three categories, fulls partials and those
which are on the edge of the cusp region and are partly visible.
They are colour coded as follows:
  blue:    fulls
  yellow:  partials (up to maximum used in the prediction)
  red:     cusp partials
- Partiality 1
- The spots are colour coded by their partiality as follows:
blue: fulls cyan: partial <=n as set in the Partial 'n' panel item yellow: partial >n and up to the maximum used in the prediction orange: wide partial (greater than the maximum partiality used in the prediction red: cusp partial - Partiality 2
- The spots are colour coded by their partiality as follows:
blue: fulls cyan: partial =2 green: partial =3 yellow: partial >3 and up to the maximum used in the prediction orange: wide partial (greater than the maximum partiality used in the prediction red: cusp partial - All the same
- All the recorded spots are displayed in the same (blue) colour
- Overlap status
- The spots are colour coded by whether or not they are spatially
overlapped. The colour coding is as follows:
 blue:    not overlapped
 yellow:  spatially overlapped spot
The 'Spot types' choice menu on the control panel allows the user to choose one of the following three options:
- Display 'all' spots i.e. fulls and partials
- Display fulls only
- Display partials only
The display of spatially overlapped spots may be controlled via the 'Spatials' choice menu on the control panel. There are three options:
- Display all spots including spatially overlapped spots
- Exclude spatially overlapped spots
- Display the spatially overlapped spots only
The user may select one of three spot sizes, small medium or large for the display via the 'Spot size' choice menu on the control panel.
The display, of a key at the top left of the display area showing the colour coding, may be turned on or off via the 'Key' choice menu on the control panel.
The partial 'n' value, used in deciding which category a partial spot is to be included in for the Partiality 1 colour coding option a nodal can be reset via the Partial 'n' value item on the control panel. The value must be in the range of 2 to the maximum value used in the prediction.
Listing Spot Details
When the mouse Button1 is pressed with the cursor on a spot position, details of that spot will be listed in the spot details area. The following information is listed:
- The indices
- The coordinates
- The coordinates
- The 'film' xf, yf coordinates in millimetres
from the centre of the pattern.
- The partiality
- For a fully recorded spot the message 'fully recorded' is given.
For a partial the partiality is given and the offset from the current
image of the start image for the spot is indicated. 'Wide' or 'Cusp'
partials are flagged as such.
- The overlap status
- The spot will be flagged asa 'non-overlapped' os as an 'overlapped' spot.
Hard Copy
To get a hard copy plot in the form of a Postcript file, select the panel button marked PS in the hard copy request area at the top of the view object. A question and answer sequence is then followed using a panel i/o item to the right of the PS button. Invalid replies will give pop-up error notices. The hard copy output may be abandoned by pressing the Escape key when a prompt is displayed. The question and answer sequence is as follows:
- Postscript file name:
- This reply is the name of the output Postscript file.
- Spot diameter in mm [x.x]:
- This gives the required spot size for
the spots which need not be the same
as that on the display. The default
value given is an approximate match
to that currently being used on the
display. The reply must be in the range
of 0.1 mm to 10.0 mm.
- Add key [y]:
- This enables the user to choose whether
(the default) or not to display a
key on the output plot. This key, with
some additional information describing
the nature of the plot, will be output
below the actual rotation simulation.
- Comment:
- Up to 150 characters of comment may be input. The comment will be automatically split into lines if needed.
Note: On monochrome displays, these rotation simulations are of limited use as all the colours in the colour scales are represented by white. However any hard copy requested will have the normal colour representations in it.
- Fulls/partials
- Interactive Display
When this option is selected, the rotation simulation is displayed as black spots displayed on a white background. Various options may be selected via the control panel items (full details of how to manipulate these items are given in chapter 3). These include options to vary various parameters via a slider, options to highlight various classes of spots and options to label selected spots. Also, details may be listed for selected spots and hard copy Postscript file plots produced if required.
Control Panel Options
A 'Slider variable' panel choice item determines which of the available variable parameters can currently be adjusted via the slider. The parameters which may be varied under slider control are:
- The rotation range for an image (in degrees)
- The mosaicity in degrees (Eta)
- The vertical beam divergence in degrees (Divv)
- The horizontal beam divergence in degrees (Divh)
- The wavelength dispersion delta-lambda/lambda times 1000 (Delamb)
The use of the slider was designed for use on colour displays which have 'writeable colour maps'. In fact 50 colours are used on the display with the spots being 'colour coded' by the value of the current variable parameter. The 50 colours are then set to white or black depending on the position of the currently selected slider. If the slider is moved then the display is altered merely by changing the colours in the colour map thus giving a rapid change of pattern as the slider is moved. On displays which do not have writeable colour maps and on monochrome displays, the use of the sliders is less effective as the pattern needs to be redrawn each time a slider is moved.
The current values for the parameter being varied is displayed to the right of the slider. The overall range is defined by the calling program.
The 'Highlight' choice menu on the control panel may be used to enable various classes of spots to be highlighted. The options available are as follows:
- No highlighting
- This is the default; all spots are shown as black spots.
- Highlight fulls
- Fully recorded spots are indicated by blue vertical
crosses; partials remain as black spots. (on monochrome displays, the
corresponding symbols are drawn in black)
- Highlight partials
- Partials with a partiality <= the value set via the Partial 'n' panel value item are displayed as blue vertical crosses; partials with a higher partiality are displayed as red crosses and cusp partials are displayed as green stars (or black on a monochrome display).
Note: When spots are highlighted and the soft limit sliders are used, the plot will be redrawn each time a slider is moved. The sliders are best used when no spots are highlighted.
The user may select one of three spot sizes, small medium or large for the display via the 'Symbols' choice menu on the control panel.
The partiality value defining the boundary between the two main classes of partials may be set via the Partial 'n' value item on the control panel. The value must be in the range of 2 to the maximum value used in the prediction.
The 'Labels' choice menu allows a number options for labelling. These are:
- Labels off
- No labels will be displayed and the
labelling facility is currently disabled.
- Labels on
- Display any labels which have been added to the plot as described below.
If there are labels already displayed when a new labels option is selected, the existing labels will be redrawn as needed.
Note: When labels are displayed the plot may be redrawn if the slider is moved because a spot has disappeared or reappeared. The sliders are best used when no labels are displayed.
Listing Spot Details
When the mouse Button1 is pressed with the cursor on a spot position, details of that spot will be listed in the spot details area. The following information is listed:
- The indices
- The coordinates
- The coordinates
- The 'film' xf, yf coordinates in millimetres
from the centre of the pattern.
- The partiality
- For a fully recorded spot the message 'fully recorded' is given. For a partial the partiality is given and the offset from the current image of the start image for the spot is indicated. 'Wide' or 'Cusp' partials are flagged as such.
The selected spot is marked by a surrounding red circle on the display area (black on a monochrome display). The selection may be removed by clicking Button1 when the cursor is within the display area but not pointing to a spot. When Button1 is pressed, the nearest spot to the cursor is selected provided that the distance squared (pixels) to the spot is no more than 18.
The spot details are also listed when a spot is labelled.
Labelling Spots
Providing that one of the labelling options has been selected via the 'Labels' choice menu, spots may be labelled on the plot as follows:
- Move the cursor to the required spot.
- Press and hold down Button2 of the mouse.
- Move the mouse till the label is in the required position.
- Release Button2 of the mouse.
A line is drawn from the nearest corner of the box surrounding the label to the labelled spot. When a label is being positioned, this line is shown while the label is near to the spot but if the label is moved far from the spot, then instead of the line, the spot position is marked with a large cross and the label is detached; when Button2 is released, the cross is removed and the attaching line is drawn.
Labels may moved as follows:
- Move the cursor onto the label to be moved.
- Press and hold down Button2 of the mouse. Note that when
Button2 is pressed, the plot will be redrawn.
- Move the mouse till the label is in the required position.
- Release Button2 of the mouse.
Labels may be deleted as follows:
- Move the cursor onto the label to be deleted.
- Click Button3 of the mouse.
Hard Copy
To get a hard copy plot in the form of a Postcript file, select the panel button marked PS in the hard copy request area at the top of the view object. A question and answer sequence is then followed using a panel i/o item to the right of the PS button. Invalid replies will give pop-up error notices. The hard copy output may be abandoned by pressing the Escape key when a prompt is displayed. The question and answer sequence is as follows:
- Postscript file name:
- This reply is the name of the output Postscript file.
- Standard (s) or absolute (a) scale [s]:
- With standard scaling, the simulation
will be 18 cm square. For absolute
scaling, the plot will be on the
actual scale as determined by the crystal
to film distance. If this gives a plot
larger than 18 cm square, then a warning
message will be given and the plot
will be clipped.
- Spot diameter in mm [x.x]:
- This gives the required spot size for
the spots which need not be the same
as that on the display. The default
value given is an approximate match
to that currently being used on the
display. The reply must be in the range
of 0.1 mm to 10.0 mm.
- Symbol size in mm [x.x]:
- This question is only asked if spots
are being higlighted on the current
plot. This gives the required size for the
symbols to be drawn on the plot; these
symbols need not be the same size
as those on the display. The default
value given is an approximate match
to that currently being used on the
display. The reply must be in the range
of 0.5 mm to 10.0 mm.
- Use coloured symbols [n]:
- This question is only asked if spots
are being higlighted on the current
plot. By default the symbols on the
hard copy will be plotted in black
but coloured symbols may be requested
if desired.
- Comment:
- Up to 150 characters of comment may be input. The comment will be automatically split into lines if needed.
- The rotation range for an image (in degrees)
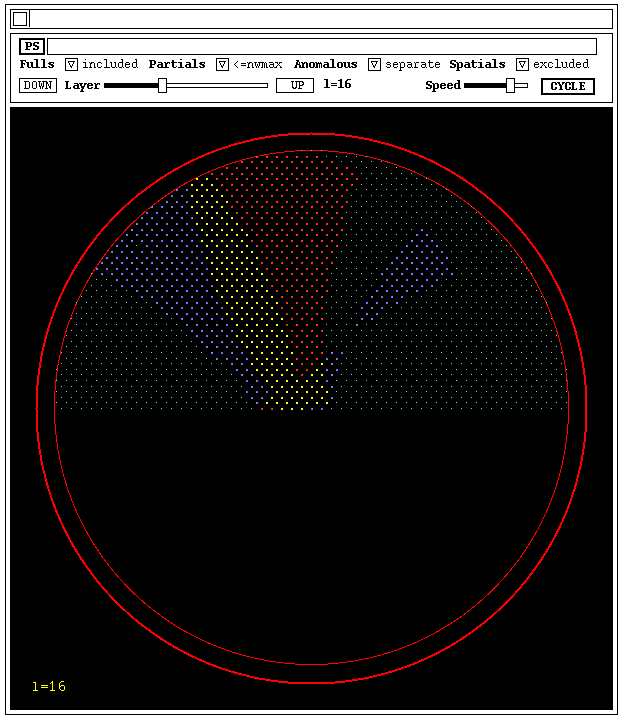
2.17 THE SHOW UNIQUE COVERAGE VIEW-OBJECT
This view-object was written for specific use within the ROTGEN program written at the Daresbury Laboratory. It is used to display, in pictorial form, the coverage of the unique part of the reciprocal lattice by the currently predicted and/or measured data. The main display area shows a single section of the reciprocal lattice at a time showing which reflections are part of the unique area of the reciprocal lattice and which of these reflections have been predicted or observed. Different categories of reflections e.g. fulls and/or partials may be included in the plot and, where appropriate, merged or unmerged anomalous data pairs may be indicated. Spots predicted as spatial overlaps may be included or excluded as desired. Spots which are classified as unknown full/partial (e.g. derived from a merged dataset) are included in the display as fully recorded (and non-spatially overlapped) spots. If anonalous separated data is displayed then these spots may also be of unknown sign (see below for colour coding). The user may change the section displayed using the 'Up' or 'Down' buttons or the slider provided. Alternatively there is an option to cycle automatically through the sections. In all cases the section axis is along 'l'. On the l=0 section the a* and b* axes are displayed. Two forms of hard-copy Postscript plots may be produced; one is basically a copy of the currently displayed plot and the other enables plots of all the reciprocal lattice layers (at a selected interval if required) in a more compact format with nine sections being output on each page.
Figure 2.16 Example of show unique view-object
The control panel area is situated at the top right of the view-object below the active strip.
The control panel contains the following panel items:-
- A drop down menu to select whether or not to include fully recorded
reflections.
- A drop down menu to select which categories of partially recorded
reflections are to be included in the plot.
- A drop down menu to select whether or not anomalous data is to be
presented in merged or unmerged form.
- A drop down menu to select whether or not reflections predicted as
being spatially overlapped are to be included in the plot.
- A button labelled 'DOWN' to move down one layer through the reciprocal
lattice.
- A slider to select the layer of the reciprocal lattice to be displayed.
If there are many layers, this may be used to get quickly to
approximately the required part of the reciprocal lattice to be displayed.
The 'UP and 'DOWN' buttons may then be used to get to an exact layer
if required.
- A button labelled 'UP' to move up one layer throogh the reciprocal
lattice.
- A button to start or stop automatic cycling through the reciprocal
lattice layers. This either has the label 'CYCLE' or 'STATIC'
depending on the current mode.
- A slider to control the speed of automatic cycling through the sections.
The points on the unique part of the reciprocal lattice are marked by small greenish dots for those spots which have not been predicted/measured. Where anomalous data are merged, all predicted/measured relections are represented by yellow dots. Where the anomalous data are to be separated the following colour coding is used.
       yellow:    Both an I+ and an I- reflection are present.
       red:       Only the I+ reflection is present.
       blue:      Only the I- reflection is present.
       white :    Unknown sign (i.e. both I+ and I- are not present
                  though I+ or I- may be present in addition to
                  measurements flagged as being of unknown sign.
The current layer number is shown both at the bottom left corner of the
plot and to the right of the layer 'UP' button on the control panel.
Hard Copy
To get a hard copy plot in the form of a Postcript file, select the panel button marked PS in the hard copy request area at the top of the control panel. A question and answer sequence is then followed using a panel i/o item to the right of the PS button. Invalid replies will give pop-up error notices. The hard copy output may be abandoned by pressing the Escape key when a prompt is displayed. The question and answer sequence is as follows:
- Postscript file name:
- This reply is the name of the output Postscript file.
- Colour [y]:
- The reply is 'y' (the default) if the colours are to be preserved
in the postscript file. If the reply is 'n' then a black and white
plot will be output. In the latter case, a dot indicates both I+ and I-,
a + sign indicates I+, a - sign indicates I- and a diagonal cross
indicates unknown sign.
- Current {c), all (a), no. or range [c]:
- There are four basic replies which may be made:
- A reply of 'c' (the default) requests a plot of the current section
only. The hard copy plot will be very similar to the displayed plot
in this case.
- A reply of 'a' to plot all sections; these will be output in a much
reduced size form with nine plots per page of output.
- The number of the section to be plotted (the section will be plotted
as described for the current section plot).
- Two numbers being the first and last sections to be plotted. These may optionally be followed by a third number being an increment in the sections to be plotted. The plots will be in the reduced size form with up to nine plots on a page.
- A reply of 'c' (the default) requests a plot of the current section
only. The hard copy plot will be very similar to the displayed plot
in this case.
- Symbol scale factor [1.0]:
- This will scale the default sizes used for the symbols by this factor.
This may be used to improve the quality of the plot perhaps either to
increase the symbol size for a small cell or decrease it for a large
cell.
- Comment:
- Up to 150 characters of comment may be input. The comment will be automatically split into lines if needed.

John W. Campbell
CCLRC Daresbury Laboratory
Last update 4 Feb 1998