
 |
CCP4i: Graphical User Interface |
| Introduction |


|
- Getting Started
- Documentation and Help
- Directories and Project Directory for tidy file organisation.
- Saving Defaults
- Task Window Format
- File Selection
- MTZ Column Selection
- Extending Frames and Toggle Frames
- Cutting and Pasting into CCP4i Windows
Saving and Restoring Task Parameters
The Mouse Buttons and Function Keys
Getting Started
To run the Interface you must have the standard CCP4 program setup - it will stop with a warning message if it can not find CCP4 programs and data files! Then type:
- ccp4i
- which will bring up the Main Window of the Interface. Alternatively:
- ccp4i -h[elp]
- will list a short help text which indicates alternative ways of running the Interface - including:
- ccp4i -t[ask] taskname
- which will run a cutdown version of the Interface to set up one CCP4 program or task (where the task might be one or more programs).
- ccp4i -v[iew] [filename]
- display a file using The FileViewer Utility. This utility uses the appropriate program to interpret the file contents (e.g. MTZDMP is run to list the header of MTZ files). The file type is interpreted from the file extension. If the file has a non-standard extension, do not give its name on the command line - instead enter it in the file selection window which also has a menu for you to specify the file type.
- ccp4i -g[raph] [log_file]
- display the graphs from a log file or a simple data file with columns of data, using The Loggraph Utility.
Documentation and Help
There are various levels of documentation in and around the Interface:
- Full documentation - The full documentation can be read starting from Welcome to the CCP4 Task Interface.
- 'Help' button - There is a Help button at the top right of most Interface windows. Clicking in this brings up a Netscape window with a help page describing that window.
- 'Message line help' - As you move the mouse about a window, you will notice that when the cursor is over an entry widget (either a field you can type into, or a menu or button), some explanation of that widget is flashed in the message line, which is the gold-coloured bar at the top of the window.
- 'Right mouse button help' - For more information on a specific entry widget you can click on it with the right mouse button. This will bring up a Netscape window displaying help text for that window and positioned at the explanation for that widget.
Directories & Project Directory
The first time you run the Interface the window which enables you to set up directory aliases and define a project directory comes up automatically. Alternatively it can be accessed via the Directories&ProjectDir button near the top right of The Main Window.
The CCP4 Interface is designed with the expectation that all data files relating to one crystallographic project will be in one directory. It is simple to override this but it may be helpful to organise all CCP4 work this way. You may have more than one project, and it is easy to switch between projects inside the Interface.
In the Directories&ProjectDir window, enter one-word aliases and the full pathname for the directories you use regularly. These directories can then be accessed quickly when selecting files via a menu that lists your directory aliases and goes straight to the directory you choose. The window allows distinction between two types of directories:
- those that contain everything to do with one project (i.e. the Project directories), to be entered with the Add project button. One of these directories should be selected as your current Project directory. Use the pop-up menu to select from a list of the defined project directory aliases.
- those that contain any other information you may want to use regularly, e.g. CCP4 example areas, which can be entered with the Add directory alias. In many cases, these will be directories you do not 'own' personally.
The Interface will automatically create a subdirectory of your project directory called CCP4_DATABASE. This is where the Interface stores its database for the project.
Saving Defaults
In the user's home directory CCP4i creates a directory .CCP4 which contains subdirectories:
- unix
- contains defaults files for Unix & Linux systems
- windows
- contains defaults files for Windows systems
- CCP4I_TOP
- contains a directory structure which mirrors the CCP4i distribution and which can contain any file which will be used in preference to the distribution version
In the .CCP4 directory a CCP4_session.log is created and extended as the user runs CCP4i. This file contains information which might help with trouble shooting. The contents can be viewed using the View Session Log option under the System Administration menu (bottom right of the Main Window, in the Database Options menu).
The contents of the unix or windows directories:
- directories.def
- contains the information which is viewed in the Directories&ProjectDir window, i.e. the directory aliases and current project
- configure.def
- contains your customisation of the configuration (i.e. the selection of batch queues, printers, HTML browsers etc.) if you have changed these from your general site setup
- preferences.def
- contains the preferences set in the Preferences option (bottom right in the Main Window)
- loggraph.def
- created if user modifies the Loggraph appearances (see also The Loggraph Utility)
- status.def
- created when you exit the Interface, to store 'CURRENT MODULE', i.e. the module that you used last
There may also be two other files, but these are not essential and don't cause any problems if they are missing:
- modules.def
- is your personal version of the main CCP4i modules.def file. Additional Task and module names can be placed in this file, and will appear in the task lists when you start CCP4i.
- ccp4i_packages.def
- This records information about any new tasks that you have installed in your private CCP4i area via the Install New Task function. More information about the file contents can be found here.
Saving defaults - old style, old files
Older versions of CCP4i used different ways of saving defaults. This may have left various files in the user's home directory, e.g. .CCP4_configure, .CCP4_directories, .CCP4_directories_old, .CCP4_preferences, .CCP4_session_log, .CCP4I_session_log, .CCP4_status. When using version 1.2, these can all be removed.
The Main Window
Here is what the Main Window looks like (individual parts of the picture are clickable):
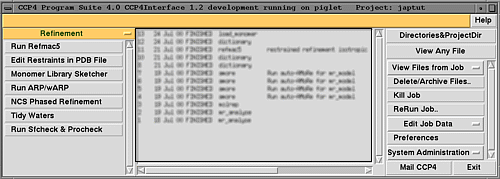 |
The main window is composed of windows, menus and buttons. Apart from the gold-coloured bar at the top, which is reserved for HELP (see above), these are as follows (from top left to bottom right):
A particular job can be selected by clicking on the relevant line in the job list. Multiple jobs can be selected by doing either control-click on another job (this adds it to the selection) or by doing shift-click (which adds all items up to the previously selected job). Multiple jobs can also be selected by clicking and dragging. (See the section on mouse buttons for a full summary.)
All jobs can be deselected by pressing the F2 function key.
This job list is the main Interface to The Database Utility.
To use the following Database Options, you must first select a job from the job list. A more detailed description of The Database Utility can be found elsewhere.
- View Files From Job menu bar -
with a pop-up menu to select the
log file or one of the input or output files from the job,
to be displayed with
The FileViewer Utility.
If the file is in HTML format, you will be given the option to View File in Netscape,
which will display the log file with links to documentation and in-line graphs. Note that
there may be some delay as Netscape first loads the Java applet to display graphs.
If the log file contains summary tags, you will have the option to display just the summary.
The menu also has the option to:- View LogFile in Web Browser - to view HTML format log file directly in browser
- View LogSummary in Web Browser - to view only the summary from a HTML format log file in browser
- View Log Graphs - to view the tables in the log file with The Loggraph Utility.
- View Command Scripts - to display the input to the CCP4 programs.
- Delete/Archive Files button - to delete or archive the output files from selected job(s).
- Kill Job button - to kill the selected job (one job only can be killed in one action). You will be asked to confirm, before the job is actually killed.
- ReRun Job button - to rerun a selected job, with an option to review and change parameters used in the previous run.
- Edit Job Data menu bar -
with a pop-up menu. To edit any notebook data produced with CCP4 (or related) programs.
The menu has the options to:
- Read/Edit Notebook
- Edit Job Data
- Enter Data for External Job
- Preferences button - to change Interface defaults, e.g. for where output files go. A more detailed description can be found elsewhere.
- System Administration menu bar -
with a pop-up menu. To assist with setting up and extending CCP4i. The menu has the options to:
- View Session Log - The Interface keeps a log of the session (e.g. jobs run and files deleted) and error messages. This option will display the session log.
- Configure Interface - This gives a window to define utilities like printers and remote machines. They should have been set up when your CCP4i was installed. See also Configuration.
- Edit Modules File - This gives a window to edit the lists of Tasks and Modules which are accessible from the main CCP4i window. For more information see the documentation on the modules.def files.
- Install New Tasks - This gives a window to copy new task definitions (from a Task source) into the current installation. See also Install New Task.
- Run Tests - To aid program developers in rerunning test jobs.
The main window can be resized to alter the size of the windows and menus, which also have scroll bars.
Modules and Tasks
The Interface will run most frequently used programs from the CCP4 suite but is organised around the idea of tasks rather than programs. Usually one task corresponds to one program but sometimes more than one program may be required to perform a task or a program may be used in different tasks. The tasks are grouped into modules according to the stage in the crystallographic process they are used in (e.g. Density Improvement and Refinement are two separate modules) and three utility modules which contain tools which apply to the three main types of data (i.e. Map & Mask Utilities, Reflection Data Utilities and Coordinate Utilities). There is also a Program List 'module' which has an alphabetic list of interfaced programs.
The name of the current open module is in the
Choose module menu bar on the upper left of the
main Interface window in a gold colour (the background colour of the
documentation you are now reading). To use the pop-up menu:
Task Window Format
All of the task windows have a common format.
Each task window is divided horizontally into sections called folders. In general, the folders may be open so that you can see the contents, or closed so that only the title line is visible. Folder status is indicated by the small square button on the right hand side; it can be toggled open and closed by clicking anywhere on the title line.
The top two folders of a task window can not be closed, and are always:
- The Protocol folder
- First check the options in the protocol folder as they represent the key decisions; dependent on this input the defaults and options available in the rest of the task window may change.
- The Files folder
- This folder is for specifying both input and output files, and the column data in the MTZ files.
- The file selection and MTZ column selection options have a common format in all the task windows. The input file selection is above the output file selection. After selecting the input file a reasonable name is automatically derived for the output file. This output name can be changed if desired.
- Where appropriate an input file is read automatically and data are extracted to provide reasonable defaults for some options and to simplify selection of MTZ column data. You may notice a pause after entering a file name while the file header is read.
The number and contents of the other folders will be dependent on the task, and folders which contain less commonly used options will be closed by default.
At the bottom of the task window are options for saving and restoring parameters (Save or Restore) and for running the task (Run).
The file selection line:
The Interface makes assumptions about where input files will be (in the
Project directory) and where output files should go (either the Project directory or
TEMPORARY for large or temporary files). The TEMPORARY directory
is the CCP4 program scratch directory usually defined by the $CCP4_SCR
environment variable, but this can be changed in the
Directories&ProjectDir window.
These defaults/assumptions can be overridden using the following widgets:
- Default directory menu
- The pop-up menu has a list of the defined directory aliases and the options of the CURRENT directory and the TEMPORARY directory.
- File name entry
- You can type in the name of the file. If no directory path is specified, the file is expected to be in the default directory. If you select a file which is not in the default directory, then its full path name will be displayed. Otherwise only the file name, without the path, is displayed.
- Browse button
- Click this to open a File Selection window to select the file. A detailed description of File Selection can be found elsewhere.
- View button
- When this is clicked, the selected file is listed to a separate viewing window by The FileViewer Utility.
In addition to (and as an alternative to) these widgets, you can use the File Name Completion feature. Typing the initial letters of a file name (wildcards accepted) and pressing the <Return>/<Enter> button will bring up a window listing all files whose names begin with those letters, one of which can be selected.
The MTZ column selection line:
Each column selection line will allow selection of one or two sets of column data. Where there is the option to select two sets, the second set is a Sigma or Weight for the first set.
Input column data has a default selection of "Unassigned" until the input file is selected. Then the column data is read automatically from the file, and a pop-up menu, listing the names of all column data of suitable data type, is created. At the bottom of the menu list is a List All Labels option which will list all the column labels (it may be necessary to use this if your columns do not have correct types).
Sigma or Weight column data in an MTZ file are assumed to be associated with the preceding data column. Where there is no such data in the MTZ file, an "Unassigned" option will appear in the menu. When you change the F or Phi column selection, the Sigma or Weight selection will be updated automatically.
Most programs do not have fixed requirements on column data input. The Interface usually has options in the Protocol folder for you to specify what you are trying to do and it will then provide the fields to enter the necessary column labels. Usually the first item on the column label line is compulsory but the Sigma or Weight may be optional and can be left as a blank or as "Unassigned".
Extending Frames and Toggle Frames
To understand what these are, look at examples:
Both extending frames and toggle frames have two control buttons underneath them. The button on the right, which has a context-dependent label, allows the user to open an extra frame beneath those which might already be open. The button on the left is a menubutton Edit List with access to some simple editing functionality to delete and copy frames. There are options to:
- Delete last item
- Self-explanatory
- Delete selected item
- Upon selecting this option, the user is advised to "Use right mouse button to click on a widget in the line to delete" (see Message Line Help bar)
- Copy selected item
- Similarly to the second option, the user is advised to use the right mouse button to select a line, which can then be copied directly below ANY line by clicking the right mouse button in any field on the desired line.
- In addition, external information can be copied using the SHIFT key plus the right mouse button, as described below.
Extending frames are usually just single line frames but can have more than one line. Toggle frames are usually multi-line frames which also have a title line with a toggle button which controls the display of the frame contents. Note that closing a frame does not make the contents 'go away' or switch them off!
Cutting and Pasting into CCP4i Windows
The standard facility of cutting a selection by holding down the left mouse button as you drag the cursor over the required text and pasting by clicking the middle mouse button while the cursor is in the target field, works throughout the Interface. All of the selected text will be put into the target field.
Cut and paste is often most useful for copying data such as coordinates which appear in the Interface as three separate fields. Using the conventional cut and paste to select the x,y and z coordinates and then pasting into the field for the x-coordinate would put all of the data in the x-coordinate field. To do this successfully, paste by holding down the SHIFT key and click with the right mouse button in the x-coordinate field. The input string will be split into words and the first word placed in the target field and the following words placed in the entry widgets to the right of the target field. If there is already data in any of these fields, it will be overwritten. If there are more words input than there are entry fields in the line, then the extra input data will be ignored.
It is sometimes useful to paste in several lines of data at a time - for example coordinates for several heavy atoms. This can be done if the target fields are part of an extending frame, i.e. if they appear in the Interface with the buttons Edit list and Add 'whatever' beneath them. The input text must be split into separate lines with one input line for each line in the Interface window. The first line of input text will be split into words and the first word placed in the target field that the user clicked; the following words will be placed in the following fields of the same line. The next line of input will be placed in the next line on the interface (if there is not a line there then one will be opened) with the first word entered in the field underneath the one clicked, and so on. Note that if the interface line has fields for extra data on the line either before or after the fields that you want to fill (e.g. atom types and Bfactors on the same line as coordinates), then the pasting option should handle this correctly.
Sometimes the input text might include extra words on the line which you do not want to go into the interface. To handle this, the Interface will display the Paste window when you try to paste multi-line text with the shift-right-mouse-button option. This window will list the input text and has options to skip input at the beginning and/or end of each input line.
Beware if the text you are copying from has very long lines which wrap round. When you select this text, the wrap round text will be considered to be on a new line.
Validating User Input
Entry fields which MUST have some user input for the task to run are indicated in a contrast colour (the gold background colour of the documentation you are now reading) which persists until you have entered something appropriate. Any field will adopt the contrast colour if your input is inappropriate. The Interface checks your input either when you press the <Return> key with the cursor in the entry field or when you move the cursor out of the entry field. Currently the checking is:
- real and integer numbers are input where appropriate
- input files exist
- output files do not already exist
- space group names or numbers are one of those in symop.lib
Saving and Restoring Task Parameters
At the bottom of task windows is the option to Save or Restore the parameters set up with the task interface. This provides a means to save your parameters which is supplementary to the Database - when a job is run, the Database automatically saves the parameters which can be accessed again via the ReRun Job button.
The Interface convention is for files with lists of parameter values to have the extension .def and to have a simple common format. For example the initial parameters of any task interface are defined in files called $CCP4I_top/tasks/taskname.def.
The Interface keeps the contents of the task window for the duration of the present Interface session, or until you change them manually.
| Save or Restore option | description | |
|---|---|---|
| Save to File | ||
| > | User's Defaults Directory | The parameters will be saved to a file $HOME/.CCP4/CCP4I_TOP/tasks/taskname.def.
Whenever you run this task, the parameters will be taken from
this file unless you also set a project default file which will take precedence. BEWARE: Use this option with discretion or you could find your version of the Interface always coming up with the 'wrong' parameters. It may, however, be useful for tasks with a lot of input that you will run repeatedly. You can unset the defaults with the Unset Project Defaults option. |
| > | Current Project Default | The parameters will be saved to a file in the current project database subdirectory called $Project/CCP4_DATABASE/taskname.def where taskname is the name of the task. Whenever you run that task interface within the same Project, this file will be used to initialise the parameters in the Interface. Heed the warning above. |
| > | Select File Name | You will have to enter the name of the file to save parameters to. You will also need to explicity Restore the parameters from this file. |
| Restore from File | ||
| > | User's Defaults Directory | Restore from file $HOME/.CCP4/CCP4I_TOP/tasks/taskname.def if the file exists. |
| > | Current Project Default | Restore taskname.def from the $Project/CCP4_DATABASE directory. |
| > | Select File Name | Select any previously saved .def file from a chosen directory. |
| > | Select Job Number | The Interface saves a .def file for every job that has run successfully. Select a job number (see the Job List window) and the .def file saved by the Database for that job will be read. |
| Restore Default Parameters | Clear all fields and restore default values. | |
| Unset Project Defaults.. | If the current contents of a default taskname.def file are no longer valid, you can unset them with this option. A small window will come up, pointing out the current project default file, in which you can choose to delete the .def file or to save it to another filename. | |
Running a Task
When all parameters are set to your satisfaction, use the Run button at the bottom left of the task window. There are three run modes:
- Run Now
- The task is run 'in background' - you can continue using the Interface while the job is running.
- Run&View Com File
- To display the command line and command file for all CCP4 programs that are run. You can edit the command file(s). This is a useful means to enter unusual options or check the Interface has produced the command input you expected.
- Run Remote/Batch/Later
- To run a script on a remote machine (using the Unix system rsh command, with a preset choice of machines), and/or to start at a later time (using the system at command). And, if this is supported by your local system, to submit the job to a batch queue (with a preset choice of queues and the possibility to use specific batch options).
- This Run option may be aborted at any time using the Abort button in the Run Remotely/... window.
- There is an option to View and Edit the Com File when the job is run remotely. This works like the same option when running programs locally, but beware: it probably is not appropriate when running a job in a batch queue.
A more detailed description of how to run jobs can be found elsewhere.
Following Job Progress
As soon as a job is set running, an entry for it will appear in the Job List, indicating the number of the job, day and time, STATUS, and task(s) of the job. The status information is updated as the job proceeds and the possible values are:
| ON_HOLD | The script has been created but not run. |
| STARTING | The Interface is writing the script to run the job. |
| RUNNING | The job is running. |
| ERROR | The job failed due to an error in the script (please report this to the Interface developers). |
| FINISHED | The job has finished. |
| KILLED | You have killed the job. |
| FAILED | A CCP4 program failed. Look at the log file first. |
| REPORTED | This job was run external to the Interface. Information entered through Enter Data for External Job in the Database Menu. |
| REMOTE | The job is running remotely (or may be waiting to run). Note that there may be a short delay between the job completing and it being reported as FINISHED. |
The log file can be viewed using View Files from Job from the Database menu and selecting View Log File. The display will be updated as the log file is written out.
The Mouse Buttons and Function Keys
The left mouse button is used to click options in the Interface.
The right mouse button will bring up appropriate documentation,
in the browser, of a field (could be a menu or a button, too) when the
focus is in it.
The right mouse button is also used to select a line in a list when you are
using the Edit List option.
The Shift-right-mouse can be used to paste selected data into multiple fields.
Within the Job List, individual jobs are selected by the left mouse button. Multiple jobs can be selected by doing either control-left-mouse on additional jobs, or by doing shift-left-mouse. Multiple jobs can also be selected by left-clicking and dragging.
The F2 function key will deselect all jobs from the Job List.
Naming Conventions
Unix and CCP4 conventions for naming (sub)directories:
- $CCP4I_TOP
- The directory which contains the Interface executable(check with "printenv CCP4I_TOP").
- $CCP4_SCR
- The directory which CCP4 programs use to store temporary files. The Interface has a default alias "TEMPORARY" to this directory, but this may not be optimal for your setup.
A Note on Using Netscape
There have been a few problems with running Netscape (we are trying to fix them but they are easy to cope with if you know what is happening).
Netscape Does not Start
If you do not already have Netscape running then it should start, but if this does not happen
you may need to start Netscape outside CCP4i.
The Mail Window is Foregrounded
When you click on Help a Netscape window with the appropriate help text should be
forgrounded but sometimes the Mail window appears instead. You will have to find the right
Netscape window.
|
|